Getting Started - Installation Guide
How to install your bot.
This guide is for the standard bot in the lower right-hand corner of your website.
Paste the integration code you were emailed before the </body> tag in whichever platform you are using or in the scripts section of the website platform, usually referred to as footer scripts or body scripts.
Below are tips on how to do this for different platforms, but you can always just Google “how to install custom scripts on <platform name>”
HI THERE
Welcome to our Terms and Conditions! These boxes aren’t legally binding, you can use them as an aid for understanding the legal language.
Common installation examples:
Wordpress:
The easiest way to install the script on WordPress is to use the free WPCode plugin. After installing the plugin, follow the tutorial and place the integration script in the “footer” position (also known as the Body—End position).
Alternatively, if you do not wish to use any plugins, edit the footer.php file directly in your theme editor. Inside the footer.php file, place the integration code before the </body> tag.
For our bots to work in WordPress, you need to disable Javascript caching and minification. This will only happen if you install an optimization plugin, like SiteGround Optimise or WPRocket. If you have any kind of optimization plugin, go into the plugin's settings and disable all Javascript-related features. Simply disabling the entire plugin is not enough due to caching. Go into the plugin and specifically disable any JS-related options. See this troubleshooting article for more.
GoHighLevel:
Open a funnel, click “Settings”, then paste the code in the “Body tracking code” section as shown below:
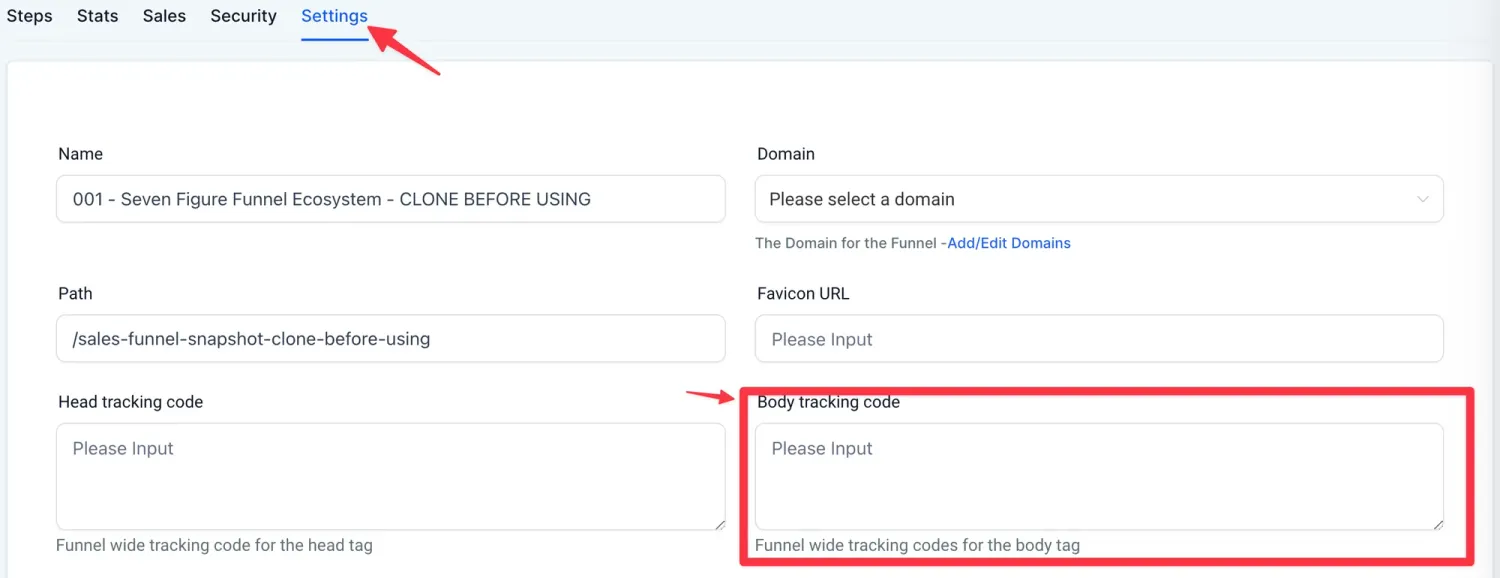
Then save your funnel, and you’re all set!
Reminder: use the GHL-specific embed code, not the universal code.
ClickFunnels:
Open any funnel, choose “settings,” then place it in the “body tracking code” field. Alternatively, open the design editor, choose the settings cog, and again place it in the body tracking code tab.
Wix:
Before you begin, ensure your site is published and has a connected domain.
1. Go to Settings in your site's dashboard.
2. Click the Custom Code tab in the Advanced section.
3. Click + Add Custom Code at the top right.
4. Paste the code snippet in the text box.
5. Enter a name for your code. Tip: Give it a name that is easy to recognize so you can quickly identify it later.
6. Select an option under Add Code to Pages:
a. All pages: This adds the code to all of your site's pages, including any new pages that you create in the future. Choose whether to load the code only once per visit or on each page, your visitor opens.
b. Choose specific pages: Use the drop-down menu to select the relevant pages.
7. Under Place Code in choose: Body - end
8. Click Apply.
Shopify:
1. Open the “Themes” tab
2. Click the “Customize” button on the right side of the screen
3. In the lower-left corner of the theme editor, click the “Theme Actions” dropdown button, then “Edit Code”
4. Go to the “Layout” folder and click on it to display a .liquid files list. Now click on “{/} theme.liquid”, this will now appear in the code editor
5. Scroll to the bottom of the code and find the </body> tag
6. Place the integration code right before the </body> tag
7. Alternatively, you can use a plugin like XO Insert Code.
If you have any styling issues with your widget once installed, see the relevant help articles in the troubleshooting section.
👉 Platform not listed? Most platforms follow a similar process to the above. If you’re struggling, just search “how to install custom scripts on <platform name>” and you’ll usually find what you need.
🚧 Unsupported platforms: Currently, the only platforms we’ve found that don't support our bots are Durable.co, Google Sites, and GoDaddy page builder. We have seen some people get inline embeddable bots working in Google Sites and GoDaddy page builder, so it may be worth trying that (see below for an inline embeddable bot guide), but we can’t offer support on this as these platforms are very limited.